Increase Manufacturing Profits with Process Accountability

“Sorry, boss, we’re going to be off our revenue target. We’re late on a few orders.”
Sound familiar? In this manufacturing scenario, the boss is left wondering why they’re late on orders and why he/she has to deal with this same situation two months in a row.
As an owner or executive, you can’t know every detail, but you should know the processes and controls that occur behind the scenes that ensure your commitments happen. They say a picture is worth a thousand words, and in the case of using process diagrams to understand accountability and control, I would definitely agree.
Process flow diagrams (PFD) have been used for decades and are a series of symbols and notations used to depict a business activity or process’s sequential flow. It doesn’t need to be perfect for your purposes, just simple enough to enhance your understanding of how things are controlled in your organization. For a better look, let’s walk through the six steps of process diagramming for manufacturers.
Step 1: Determine the Process
There are likely dozens of processes that make your organization work, from basic “order entry” to non-routine “warranty returns.” Unfortunately, in our experience, they are typically not documented consistently and rely on “legacy” knowledge to be passed down from employee to employee. That stops now.
As an executive, at a minimum, you should understand five critical processes:
- Order Receipt to Delivery (Execution)
- Billing to Collection
- Procurement to Pay
- Payroll
- Monthly Reporting
These are the backbone of your organization. Having a thorough understanding of the steps and controls inherent in each will provide you with critical transparency into your organization’s inner workings.
Step 2: Select a Tool
It’s 2023, and we’ve come a long way from the hand-drawn process diagrams our predecessors used. Several intuitive software tools fit the bill (Visio and Lucidchart, to name a couple), but there is no harm in a legal pad and a pen to get the job done. We are after the substance, not style.
Step 3: Interview your Team
You can’t understand what your team does if you don’t talk to them. Interview the managers of each process and ask them to walk you through their steps. Start by interviewing your most senior-level employee to make sure they understand the process in enough detail. (As the leader, it’s your job to coach your managers. What better way to start than to gauge their level of knowledge?)
In our opening statement, we indicate that orders are late and costing the company revenue. So, let’s explore the Order Receipt to Delivery (Execution). This process covers how the company takes an order and delivers it. It’s squarely the territory of the Plant Manager, so questions to ask him/her would be:
- How does the customer let us know they want to place an order?
- Do we require a purchase order?
- Who puts the order in the system?
- What information is entered into the system?
- Do we put the delivery date in at order entry?
- What if the cycle time is not sufficient to ensure delivery on time?
- Is the bill of material entered at that time? If not, when does it get entered?
- How do we know if the price on the customer purchase order is acceptable?
- After the order is entered into the system, what is the next step?
Remember, this is the time to get sufficient detail. If your Plant Manager does not know the answers to all these questions, require them to find the answers. It is just as important (or more important) that they know the answers too.
Step 4: Use Symbols and Arrows to Indicate Process Flow
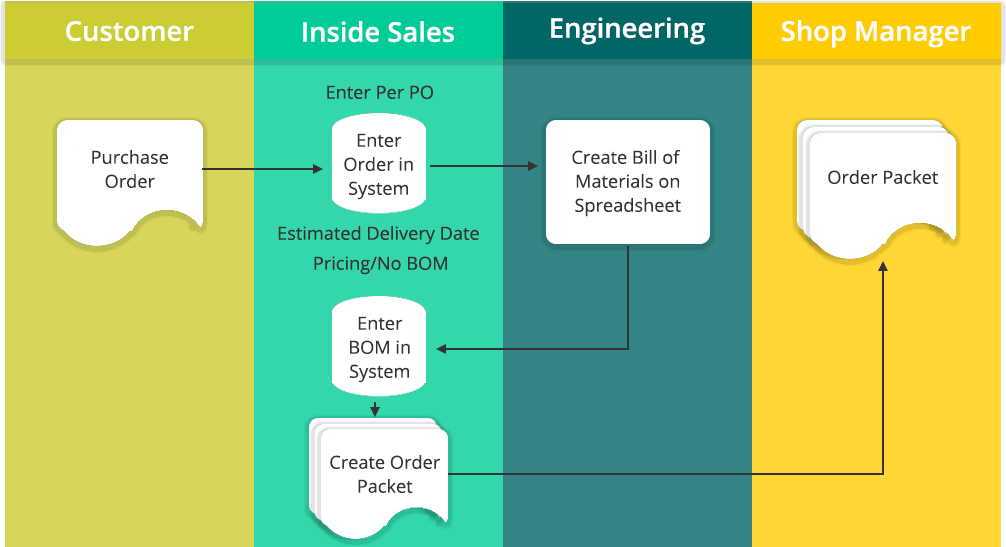
The nuances of process diagramming are beyond this blog’s scope, so I invite you to watch our on-demand webinar, Jump Start Growth with Process Mapping, to learn more details. However, at a minimum, a box per action with an arrow pointing to the next activity is necessary. In our previous Order Receipt to Delivery example, the first few steps of the process might look like this (a real example of a past client).
Step 5: Review the Process
The most important part of the Process Diagram is to compare it to what you expect. In the Order Receipt to Delivery Process, some of the things we want to accomplish are:
- Valid Purchase Order – to ensure collectability.
- Valid Sale Price – to make sure we take the order at the right price.
- On-Time Delivery – to ensure on-time delivery, we need to capture the delivery date and confirm the lead time and/or stock levels are sufficient to fulfill the order.
Note: Our process diagram above ensures we capture a purchase order upon order entry.
However, our process diagram does not provide enough detail to determine if the requested delivery date matches our cycle time or if stock is sufficient to fulfill the order on-time, which may be why the example company is late on orders.
Gaps like this one should be reviewed with your team, and a solution should be agreed upon.
Step 6: Share with the Organization
Once you have diagrammed your key processes, I encourage you to share them with your team during lunch and learns or all-employee meetings. This shows your employees where they fit into the big picture, something that we all welcome, whether we verbalize it or not. Perhaps most importantly, it confirms your commitment to process accountability so you can have meaningful conversations later. In our sample case, it may be incumbent upon customer service to check stock levels or cycle time. By confirming information with the appropriate people, you position them to be accountable for that part of on-time delivery.
Next Steps
There are numerous applications for process diagrams. It’s the first tool I utilize to learn about a business when I onboard a new client. If you want to know more about creating process diagrams and leveraging them for greater success and profitability, watch this 30-minute webinar just for manufacturers.